[it]Ciao ragazzi!
Nel blog di oggi affronteremo un tema fotografico abbastanza difficile.. ovvero la fotografia notturna con soggetto.
Questa differisce parecchio dalla fotografia notturna di paesaggio perchè è molto più difficile trovare l’equilibrio tra i vari parametri, la luce ambiente e la luce artificiale.
Qui di seguito trovate un pippozzo tecnico abbastanza pesante per i non addetti ai lavori, pertanto a chi non fosse interessato dico subito di saltare alla fine e gustarsi semplicemente le foto e se possibile anche di darmi la sua impressione 🙂
Il pippozzo tecnico
Partiamo col pippozzo: innanzitutto abbiamo bisogno di una reflex con poco rumore ad alte sensibilità (ovvero ad alti ISO), perchè saremo costretti ad usarli. Inoltre, abbiamo bisogno di lenti luminose.. almeno almeno f2.8, ma se f2 o f1.4 ancora meglio! Mentre per la fotografia di paesaggio notturno possiamo tranquillamente permetterci di scattare a ISO 100 ed f8 con il semplice uso di un treppiede, per la foto notturna a una persona siamo invece costretti a scattare a sensibilità da ISO 800 in su, e con il diaframma completamente aperto. Non ne so praticamente nulla invece della fotografia notturna astronomica, ma c’è un mio amico che ne sa parecchio, magari faremo una collaborazione!
Ecco spiegati i passi di come impostare il tutto:
- Per prima cosa mettiamo la macchina sul treppiede con la lente che vogliamo utilizzare con il diaframma completamente aperto.
- Focheggiamo su un punto all’incirca dove intenderemo mettere la modella/il modello e in modalità priorità di diaframma valutiamo quanto alzare gli ISO in maniera tale da avere un tempo di scatto dell’ordine di 1/50-1/60. Questo perchè nonostante sia possibile fare foto anche con tempi più lenti, c’è il rischio che il mosso della modella/del modello si veda nonostante a rigore venga “congelato” dal flash. Questo comporterà spesso di dover scattare a ISO 1600 o anche 3200.. se c’è sufficiente luce ambiente invece possiamo andare su 800.. in modo da avere sempre meno rumore.
- Mettiamo a questo punto la macchina in modalità manuale.
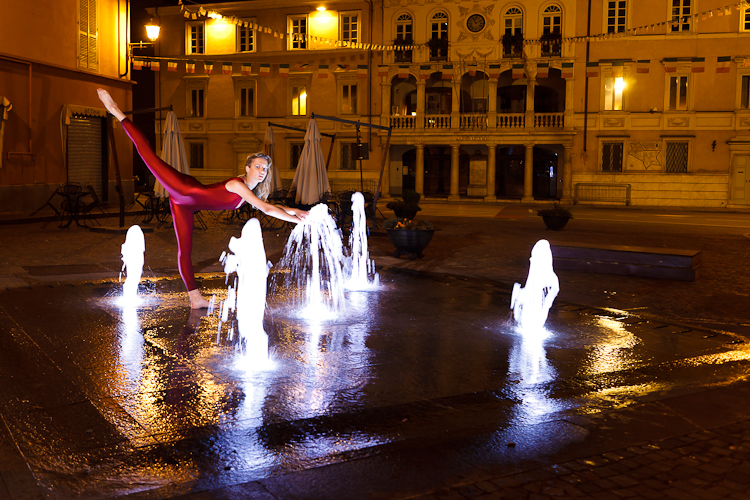
- E’ molto importante a questo punto settare bene il bilanciamento del bianco già in macchina. Scatteremo in raw, ma dato che dovremo fondere luci flash con luci ambiente dobbiamo sapere perfettamente cosa facciamo. Le luci cittadine sono molto variabili, vanno dal giallo intenso all’arancione, dal verde al magenta.. Alla fine i due bilanciamenti migliori sono il fluorescente o il tungsteno, valutate voi a seconda delle situazioni.. se no se non funziona nessuno dei due impostate un bilanciamento del bianco manuale. Nelle foto che troverete di seguito io ho usato il bilanciamento su tungsteno.
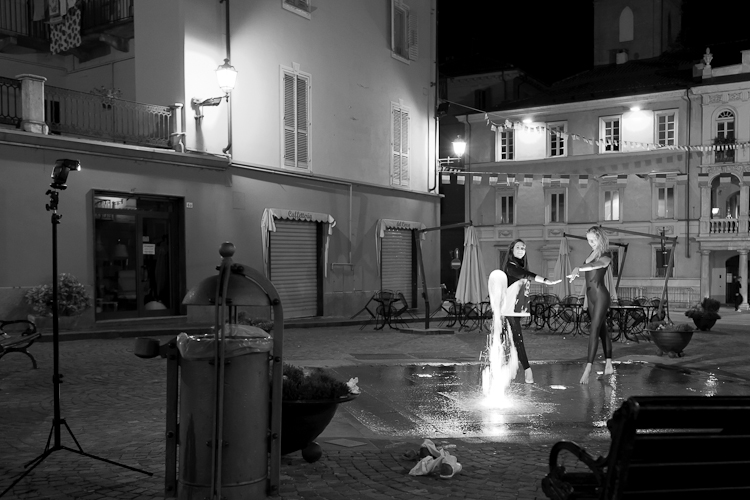
- A questo punto bisogna far entrare in scena il nostro soggetto (nel mio caso la fantastica Giada ^_^) e valutare le luci flash. Dovete avere in mente già in maniera chiara come andrà illuminato il soggetto e quindi giocare sulle potenze manualmente fino a che trovate il giusto equilibrio. Spesso, dato che usate il diaframma completamente aperto e alti ISO, non sarà necessario stressare molto i flash. Le potenze saranno dell’ordine di 1/64 – 1/16 di solito.. questo vi permette di fare molti scatti rapidamente perchè i flash avranno il tempo di ricaricarsi.
- E’ fondamentale valutare i colori dei flash. Se avete impostato il bilanciamento del bianco su tungsteno e lasciate il flash senza modificarne il colore, questo presenterà una luce azzurrina. E’ necessario quindi porre un gel colorato di fronte al flash per riequilibrare il tutto. Se avete messo il bilanciamento del bianco su tungsteno dovrete mettere un gel CTO (Color To Orange) di fronte in maniera tale che il soggetto risulti con la pelle di colore appropriato.
- Detto ciò dovete solo divertirvi 😀
Spero di essere stato esauriente in questa spiegazione, e prego tutti coloro che abbiano dei dubbi di esporli qui sotto nei commenti e vi risponderò!
Questo set fotografico è anche stato una buona occasione per provare il mio nuovo obiettivo, cioè il 135mm f2. Che dire, mi ha subito dato grandi soddisfazioni (potete vedere nella foto dalla funicolare che sfuocato è in grado di donare..).
Vi lascio alle foto di Giada, che come sempre ringrazio infinitamente per essere stata disposta a fare foto in notturna con i suoi abiti da ballerina classica!! Ringrazio inoltre il “direttore artistico” Simona e Patrizia per l’aiuto 🙂
Stefano[/it] [en]Hi guys!
In today’s blog we will face a photographic theme not so easy.. i.e. the night photography with subject.
This is quite different from the night landscape photography because it’s very difficult to find the equilibrium between the parameters, the ambient light and the artificial light.
Hereafter you can find a technical description quite heavy if you are not a photographer, so for whom is not interested I tell you immediatly to jump to the end and just look at the photos and if possible to tell me your impression 🙂
Technical description
Let’s start with the technical part: first of all we need a reflex with low noise with high ISOs, because we’ll be obliged to use them. Further, we need good aperture lenses.. at least f2.8, but if f2 or f1.4 better! While for the photography of night landscape we can use ISO 100 and f8 with the use of a simple tripod, for the night photography with a subject we are obliged to use high ISOs, often over 800, and with the diaphragm completely open. I don’t know anything about astronomic night photography, but there’s a friend of mine who know it, so maybe we will do a collaboration!
Here it is how to set everything:
- First of all let’s put our camera on a tripod with the lens we will use and the diaphragm completely open.
- Let’s focus on a point about where the model will be and in aperture priority mode increase the ISOs in order to have a shutter speed of 1/50-1/60. This because even though it is possible also to do photos with slower shutter speeds, there’s the risk to have some blur of the model, even if it should be “freezed” from the strobes. This will oblige us to use 1600 or 3200 ISO.. if there’s enough light we can still use 800 ISO, in order to have less noise.
- Let’s put now the camera on manual mode.
- It is very important at this point to set well the white balance on camera. We will shot in raw, but given that we will have to make a fusion of flash lights with ambiend lights, we have to perfectly know what we are doing. City lights are very variable, going from the intense yellow to orange, from green to magenta.. At the end the two best white balance temperatures are the fluorescent and the tungsten, you have to evaluate in every situation.. if they won’t work you have to set the white balance manually. In the photos you’ll find after the white balance was set on tungsten.
- At this point you have to make your subject enter the scene (in this case the great Giada ^_^) and evaluate the strobes lights. You have already to know perfectly how to position the lights to illuminate the subject and then just play with the powers manually until you find the right equilibrium. Often, given that you’ll use the widest aperture and high ISO, it will not be necessary to stress a lot flashes. The powers will be of the order of 1/64-1/16 usually.. this will allow you to do a lot of shots rapidly, because the flash lights will have the time to recharge.
- It is foundamental to evaluate the flash colors. If you have the white balance on tungsten and you leave the flash without a color in front of it, this will make a light blue light. It is necessary then to put a colored flash in front of the flash to equilibrate all. If you have the white balance on tungsten you’ll have to put a CTO (Color To Orange) gel on it in order to make the subject well colored.
- Now you only have to enjoy the moment 😀
This photographic set has been a good occasion to try my new lens, i.e. the 135mm f2. What have I to say? It’s great, and it gave me immediatly a lot of satisfaction (you can see its fantastic bokeh in the photo of the “funicolare”..).
I leave you to the photos of Giada, who I thank a lot for accepting to do photos at night dressed with her ballerina dresses!! I also thank Simona and Patrizia for their help 🙂
Stefano[/en]


Ottime, ma ti mancano i colori di una metropoli.
Trasferisciti a SanFrancisco….
Poi apri uno studio insieme a Dustin 😀
Apprezzo il termine “pippozzo”. Stefano Altamente Professionale.
Se ti trasferisci in una metropoli e non mi prendi come assistente, mi arrabbio.
Cmq Torino è una metropoli (anche se non ti piace).
Stefanone, sempre meglio, molto interessante!
…Però nel tempo spero di vederti usare qualche texture particolare 🙂
Un saluto a presto
Davide
Appena arrivata qui da phlearn….veramente un sito piacevole e anche il blog mi ha invogliata alla lettura….
un sorriso
Dora
Grazie mille Dora 🙂
Complimenti per il sito ed i tutorials su YouTube, piacevoli, utili e ben curati.
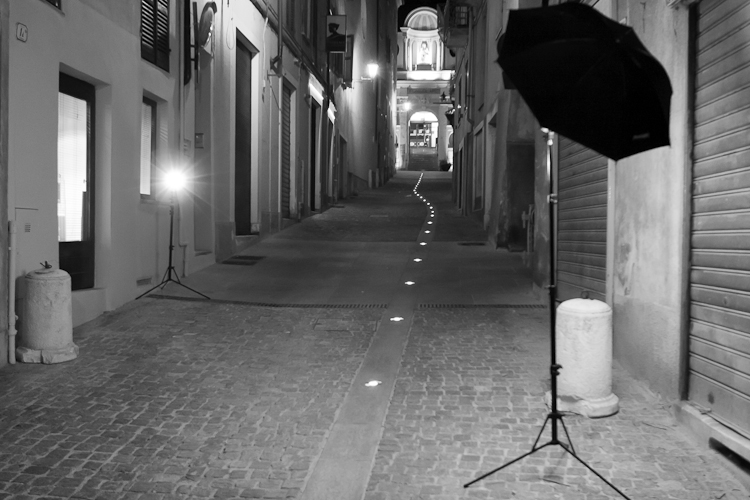
Mi piaceva avere qualche info sull’illuminazione utilizzata per gli scatti con la ballerina, molto belli (https://www.stefanotealdi.com/2011/ballerina-at-night).
Un saluto e grazie,
Marco
C’è già quasi tutto spiegato nel blog, che cosa ti interessa di più? L’unica cosa che mi sembra manchi sono gli accessori utilizzati.. Ma erano dei semplici ombrellini come puoi vedere dalle foto di backstage 🙂
Se vuoi qualche informazione più precisa chiedimela (peró le potenze dei flash sinceramente non le ricordo!)
Ti ringrazio per la risposta Stefano, ho visto dopo la mia mail la foto in b/n sul backstage… L’unico dubbio rimasto era sul flash posteriore, se con ombrellino ed eventualmente se utilizzato con bandierina nera per controllare la luce di lato.
Grazie, un saluto.
Marco
il flash posteriore era un flash nudo con una bandierina per evitare flare, e se ti interessa parabola a 105mm 🙂
ok, grazie mille, gentilissimo!
ciao
Marco
ciao stefano complimentoni per le foto.
io vorrei realizzare degli scatti in riva al fiume, inserendo una modella.
tempi che vanno da 1 a 3 secondi.. in modo da dare l’effetto mosso all’acqua, ma vorrei bloccare totalmante il soggetto.
credi che riesco (sparandogli) il flash sulla seconda tendina, a bloccare la modella completamente?
oppure ho sempre la micro scia oppure il micro mosso?
ovviamente usero’ flash da studio.
grazie
un po’ di microscia ci sarà sempre su tempi di 3 secondi, però sarà irrilevante 🙂
Ciao Stefano che ottica hai usato per questa foto?
il 135mm L f\2
Ciao Stefano, una curiosità, la dominante violacea dietro alla ballerina nella prima foto è data da una luce già presente nella scena o dall’utilizzo di gelatine?
Grazie Mille
era una luce già presente, di una pettinatrice in particolare!! 😀
Ciao Stefano, innanzitutto complimenti per i tuoi articoli, i tuoi video e tutto il resto. Sei veramente bravo ed è interessante seguirti.
Avrei un dubbio sul genere che hai appena descritto: scattando ad 1/50 o 1/60 di secondo chiaramente prendiamo la luce ambiente in quanto sappiamo bene che il flash è molto più rapido e la sua esposizione è controllata dal diaframma; tuttavia se sto scattando con un 70-200 NON stabilizzato e scatto ad 1/60 non rischio di avere del micromosso? Immagino che questo non influisca sul soggetto ma potrebbe influire sullo sfondo. Lo sfondo però è sfocato e magari il micromosso non incide più di tanto..insomma non mi è ben chiara questa cosa. Se potessi darmi qualche indicazione te ne sarei grato.
Ciao ed ancora complimenti
sicuramente stefano.. se scatti ad 1/60 con un 70-200 devi usare un treppiede, a meno che non hai la mano veramente ferma.. se no lo sfondo sarà mosso 🙂
Ciao Stefano,complimenti per tutto e grazie del contributo che dai agli amanti della fotografia,io è da poco che mi sono immerso in questo mondo intrigante della luce e avrei qualche domanda per te. Nella descrizione dici di aver impostato prima la macchina in priorità di diaframmi e dopo i vari settaggi sei passato in manuale,perché?potevi scattare anche così?avrei un altra domando io ho una mirrorless ed è presente lo slow sync su sulla prima che sulla seconda tendina qual è la differenza?ciao grazie e continua con i tutoria molto interessanti
passo sempre a manuale per evitare che la macchina mi cambi i parametri all’improvviso.. basta che veda una luce in più o un’ombra in più e li cambia da sola, e questo ovviamente non va bene perché a quel punto bisogna di nuovo cambiare la potenza del flash 🙂 non ho idea di cosa significhi slow sync, non avendo mai avuto mirrorless.. conosco solo il metodo di funzionamento normale e l’high sync (che però è una roba veloce, altro che slow) quindi mi spiace ma non so aiutarti 🙂
Ciao stefano,
ma se io usassi un yn560-tx per controllare un YN 560 II e un YN 685, perderei la possibilità di controllare quest’ultimo da remoto a causa dell’ rf-603 all’interno del 685 (che da quello che ho capito è solo un trigger che scatta) o riceve anche i dati manuali?
Grazie!
purtroppo non ho mai avuto in mano un 560-tx per provare questa cosa.. è un dubbio che ho avuto spesso anche io e che non trovo spiegato da nessuna parte, però non avendo il tx non posso dirtelo mi spiace!