[it]Ciao ragazzi!
Eccoci ad un altro episodio del blog! Oggi parliamo di flash on-camera! ….. ecco lo sapevo… sento già dei fischi dagli spalti 😀
Lo so che sono io quello che vi ha spiegato che è sempre meglio usare il flash off-camera, cioè staccato dal corpo macchina (per chi non lo sapesse ancora può vedersi il primo episodio della Guida Italiana per Lampisti) 🙂 Tuttavia capitano quelle volte in cui non si ha il tempo di preparare tutta l’attrezzatura, di montare stativi, ombrellini, trigger etc. Quelle volte bisogna affidarsi al flash on-camera, ma dato che sappiamo già che se rivolto direttamente contro il soggetto produrrà risultati orribili, dobbiamo cercare una maniera per diffonderlo ed ottenere così una luce gradevole!
Nel mio caso, la mia cara amica Giulia (che avete conosciuto nel quattordicesimo episodio della guida italiana per lampisti) è venuta a salutarmi prima di andare via da Pietra Ligure. Ormai avevamo finito il set per la guida lampisti, quindi non contavo più di far foto e non avevo preparato nulla. Ma quando arriviamo ai saluti, ecco l’idea! Giulia il giorno prima mi aveva mostrato un tatuaggio sopra la schiena, e mi ero appuntato mentalmente “sarebbe carino fare una foto in cui il soggetto è il tatuaggio“, ma poi me ne ero dimenticato.. quindi le ho proposto di farla sul momento. Ma non potevo farle perdere ulteriore tempo montando tutta l’attrezzatura, quindi ho optato per la soluzione rapida, ovvero il flash on-camera.
Impugnata la 5d mark II, e attaccato sopra il 580EXII, ho deciso per uno schema di illuminazione che so che di solito funziona bene. In casa fortunatamente ho due pareti bianche abbastanza sgrombre da quadri o altri ostacoli, quindi mi sono messo con una parete dietro di me e l’altra sulla mia sinistra. A questo punto ho puntato il flash all’indietro (leggermente spostato verso sinistra, così da sfruttare anche un po’ di rimbalzo sulla parete laterale) e ho provato a scattare (per vostra informazione avevo la reflex in modalità M, ISO 400, f/4, 1/160, e il flash in E-TTL con settaggio a 0). Come mi aspettavo la foto è venuta abbastanza sottoesposta.. Ho quindi messo +1 sul flash, ma il risultato non era ancora quello che volevo.. Lo volevo più in High Key, e allora sono andato di +2 sulla FEC (flash exposure compensation). Ed eccola lì, la foto che volevo! Tempo totale per la realizzazione del tutto: 1 minuto (prima foto realizzata alle 18:24:31, ultima foto alle 18:25:43 😀 )
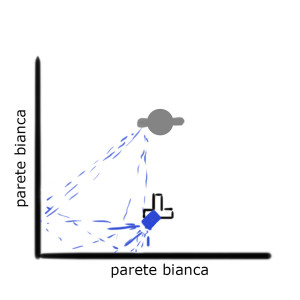
Per farvi capire bene cosa intendo ho realizzato un (grezzo) schema (perdonatemi, non sono mai stato capace a disegnare):[/it][en]Hi guys!
Here we are to another episode of the blog! Today we talk about on-camera flash! ….. I know … I can already hear the boos from the stands 😀
I know that I’m the one who said that it is always better to use the flash off-camera, that is detached from the body (for the uninitiated it may still be seen the first episode of Italian Guide for Lampisti) 🙂 But some times it happens that you do not have the time to prepare all the equipment, mount stands, umbrellas, triggers etc.. Those times you have to rely on the on-camera flash, but since we already know that if exposed directly against the subject it will produce horrible results, we must find a way to spread it and get a nice light!
In my case, my dear friend Giulia (whom you have known in the fourteenth episode of the Italian guide to lampisti) came to see me before to go away from Pietra Ligure. We had just finished the set for the strobist people video, so I thought not to take more pictures and I had not prepared anything. But when she came to visit me, here’s an idea! Giulia the day before showed me a tattoo on his back, and I was pinned mentally “it would be nice to take a photo where the subject is the tattoo,” but then I had forgotten .. so I proposed to her at the time. But I could not make her lose more time assembling all the equipment, so I opted for the quick fix, which is the on-camera flash.
Took the 5D mark II, and stuck over the 580EXII, I decided on a lighting scheme that I know that usually works well. At home I have two white walls fortunately without pictures or other obstacles, so I started with a wall behind me and the other on my left. At this point I put the flash back (slightly to the left to make a little bounce from the side wall) and I tried to shoot (for your information, I had the camera in M mode, ISO 400, f / 4, 1/160, and the flash in E-TTL setting to 0). As I expected the photo came out quite underexposed .. I then put +1 on the flash, but the result was not what I wanted .. I wanted more in High Key, and then I went +2 on the FEC (flash exposure compensation). And there it was, the picture I wanted! Total time for the realization of all: 1 minute (first photo made at 18:24:31, 18:25:43 the last picture :D)
To make you understand what I mean I made a (crude) diagram (forgive me, I’ve never been able to draw):[/en]
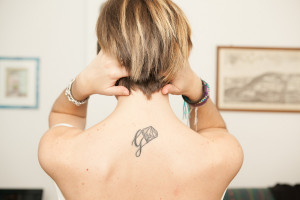
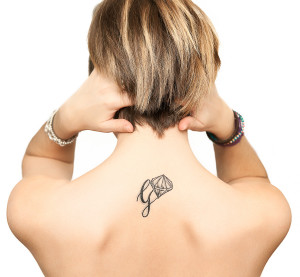
[it]E la foto ottenuta:[/it][en]The obtained photo:[/en]
[it]A questo punto si è trattato solo di fare postproduzione, ovvero di togliere elementi di disturbo, sostituire il fondo con un bianco puro e poi beh, far risaltare la foto stessa :)[/it][en]At this point it only needed postproduction, i.e. to take off disturb elements, substitute the background with pure white and then make the photo pop off :)[/en]
[it]Che ne dite? Un buon risultato per aver usato il flash on-camera vero? 😀
Alla prossima ragazzi!
Stefano[/it][en]What do you think? A good result for a on-camera flash eh? 😀
See you soon guys!
Stefano[/en]


Stefano ma nn farai più video oppure ho letto male.
Piccoli accorgimenti che creanograndi scatti!
Nella stanzetta dove scatto ho sperimentato anche io a volte questo strattagemma usando la parete bianca dietro le mie spalle come bank !
ammorbidisce parecchio la luce al punto di non produrre ombre dietro la schiena del soggetto posto difronte a me !la stanza e piccolina e tutta bianca…
mi piace a volte quando non ho tempo di montare i vari arnesi rifletterlo sul soffitto però in quel caso gli occhi sono sempre spenti perché non hanno un riflesso diretto.
no no hai inteso male 🙂 non sono riuscito a fare il video per questa foto, ma i video continuerò a farli sempre!
Bel lavoretto, per dire che è fatto in un minuto supera di gran lunga ogni tipo di aspettativa! e c’e un bel lavoretto anche in post produzione, più che altro per lo sfondo, con un risultato molto molto realistico! Veramente riesci a stupirmi ogni volta! Continua così, e grazie di tutti i consigli che ogni volta riesci a condividere con tutti!!
Stefano: “Un uomo una garanzia”, con o senza flash on camera!!!
Gli hai fatto una schiena bella pulita, priva di imperfezioni quasi per un lancio pubblicitario di qualche profumo !! Grande….
Ciao, grazie per tutto quello che posti. Io sono una principiante, ho da qualche mese la Canon 60D e un flash 320. La mia domanda è: mi trovo senza il flash esterno allora sono costretta a usare quello incorporato e vado in automatico .
Che succede? Che il flash lampeggia ma la foto e’ scurissima, come se non avesse scattato. Secondo te cosa può essere? Sai in occasioni in cui sono tesa vorrei anche poter scattare in modalità Auto…
Aiuto…
Beh, il flash integrato non bisognerebbe usarlo a mio parere, ma a volte ovviamente può capitare di doverne fare uso.. Se la foto continua a venire nera anche con il flash può essere che i parametri siano troppo chiusi per lui.. Ricordati che il flash integrato ha numero guida 13 di solito (ovvero molto debole) e quindi se fai una foto a iso 100 e f11 è normale che venga nera..